Building a Single PVE Host for Colocation and Connecting It to My LAN
I maintain a few dozen terabyte disk JBOD array at home mostly for backup purposes for myself but I also have a few family and friends that are using it. It's bothered me for a while that I only have the backups on-site at home with me. I've recently come to an agreement with a friend that if I provide my own hardware and a place that they can locate (and co-locate) their backups with me then I can place a host and storage in their home so that I can replicate my backups off-site.
A few years ago I switched to Proxmox at home for infrastructure virtualization. For this project I decided that I would like to maintain that convention. So, my design is with a single Proxmox host and attached storage. I want:
- The host to be both independently remote-manageable; and
- tunneled into my home network to participate as any other core device would. And
- the form-factor of the solution to be non-intrusive in my friend's home; and
- relatively light on power consumption. And
- the whole solution to be relatively low-cost.
Thankfully I already have all of the individual components to accomplish this project in place so setting it up is just a matter of doing the work.
Selecting the hardware
I don't need the hardware to really have any footprint at all. It doesn't need a screen, it doesn't really need anything hardware-wise except processor, memory, storage, and some kind of network connectivity. My existing 4-node cluster is comprised entirely of Lenovo W540 and 541s, so starting there was obvious. But, I also really didn't want the solution to be inviting to potentially-prying eyes so the idea of dropping a laptop in his home with some attached storage didn't feel quite right. I ideally want it to be something that looks and feels foreign-enough to be an appliance that's left alone more or less like a home router. I shopped around for a W540 for a bit but decided I didn't like it. So, I sat on it for awhile to think.
17 years ago now I deployed my first miniature computer. It was a thumb-drive with a NIC running some flavor of GNU/Linux. It was a web server serving up a simple static website in a small office and although it was very underpowered it worked perfectly for my needs. I'm partial to unusual, small form-factors which is why my primary computer is a little mini-ITX box with several hard drives custom-mounted (crammed) inside it. So, I looked around at options for smaller-form factor solutions and settled on a "mini PC". Looking at reviews for a while I came to the conclusion that with these little things it's more or less a crap-shoot so in terms of price for performance I selected the Trycoo WI-6 Pro Mini PC with a 4-core N100, 8 GB of memory, and a 256 GB SSD. I upgraded it to 32 gigabytes memory because 8 was going to be a little tight for my needs. You can check it out here: https://trycoo.net/products/wi-6-8g-256g-mini-pc

It supposedly included a Windows 11 license but 1) I didn't want Windows, I wanted Proxmox and 2) there's no way I'm trusting whatever packaged OS they send with this thing. Importantly, it supports USB 3.2 for a 10Gbps link speed to the storage.
For storage, I just wanted dumb USB storage that I could direct attach and pass through to the fileserver VM so I selected the IO CREST SY-ENC50125 8 bay 2.5" and 3.5" USB-C SATA External Enclosure. You can check it out here (it's just a rebranded SYBA device): https://www.sybausa.com/shop/it-products/external-multi-bay-hdd-enclosure/usb-3-2-10gbps-type-c-8-bay-2-5-inch-and-3-5-inch-sata-hard-drive-external-hard-drive-enclosure-sy-enc50125/

Importantly this device can hold the several 8 TB disks I'll be installing and it supports USB 3.2 for a 10Gbps link speed. I also appreciate that each of the disks is independently powered since it makes installing and removing them much cleaner in my opinion.
Installing and configuring Proxmox Virtual Environment
Installing PVE is pretty straightforward. I downloaded Rufus and the latest version of PVE, prepped a USB thumb drive with Rufus, plugged it into the Trycoo WI-6 and installed it. I did get into the BIOS for the WI-6 to make sure that Vt-x (and Vt-d) was turned on, which it was by default. The install went without any issue.
Configuring PVE for my needs was a little unusual. I want the host to be independently manageable from the VMs and I want to be able to reach and interact with it any time it has internet. I didn't want my friend to have to worry about 1) running a cable to the host or 2) managing the network as far as subnetting, DHCP, etc. So, I decided that I was going to use wireless connectivity for everything. The catch is that PVE doesn't come with any kind of desktop environment by default. This means that if I need a remote user to intervene directly at the console to configure the network or do any kind of offline troubleshooting for me it was going to be fairly cumbersome since they don't know anything about PVE or even GNU\Linux. Thankfully the developers of PVE themselves use a desktop environment in their testing and have even provided documentation for how to install and configure one. I followed this guide https://pve.proxmox.com/wiki/Developer_Workstations_with_Proxmox_VE_and_X11. I opted for Mate instead of XFCE4 although I'm sure I would have been happy with either. Importantly, I did have to make a couple of configuration changes post-install to get it to where I am happy with it and I am confident I could reasonably-easily walk someone else through the process of connecting to a wireless network.
First, while the desktop environment worked great after install the desktop itself was entirely unresponsive. There were no desktop icons on it and it didn't respond to right-clicks. Bewilderingly, I found this to be an intentional configuration easily corrected with dconf:
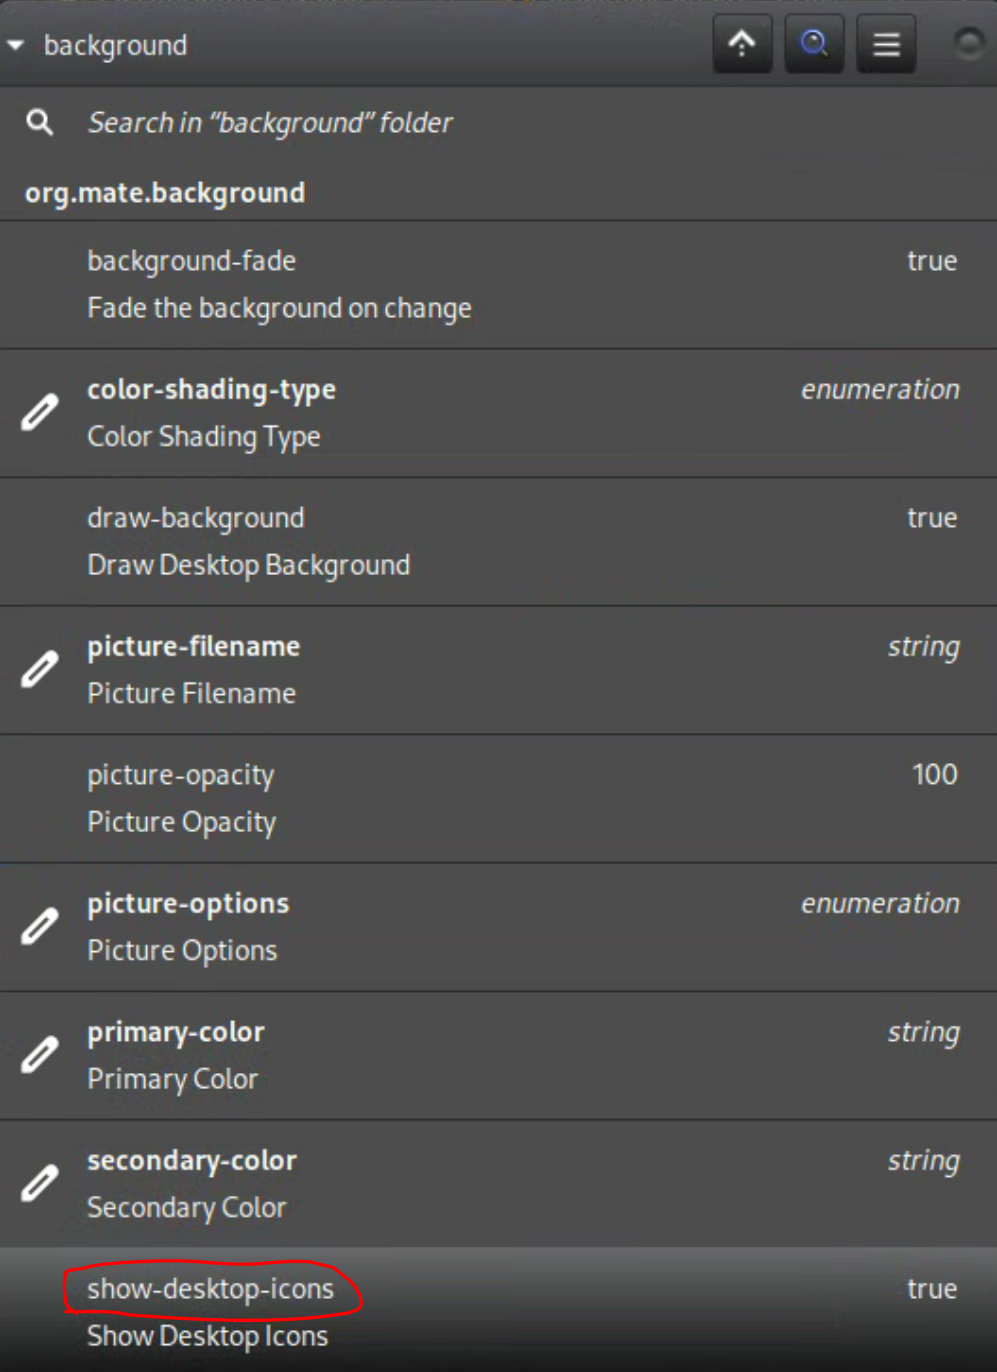
I set show-desktop-icons to true and it was good to go. Next, there were no tray icons including wireless configuration (Network Manager). PVE doesn't ship with the Network Manager package installed so I had to install the package and then add the icon to the tray. Additionally, Network Manager doesn't manage interfaces in /etc/network/interfaces by default so I had to enable that option as well. Remember, I'm using wifi only on this host so I had to configure that in /etc/network/interfaces upon install in order to get connectivity.
Speaking of connectivity, as I mentioned I want the host to be independently accessible to me regardless of what's happening with the virtual environment. Since I only have a single NIC (wifi) I have to share that connection with the VMs; but, unlike in the default configuration, I don't want the management interface to be attached to the VM bridge, instead I want the host to NAT traffic through to the bridge. The configuration for that looks like this:
# network interface settings; autogenerated
# Please do NOT modify this file directly, unless you know what
# you're doing.
#
# If you want to manage parts of the network configuration manually,
# please utilize the 'source' or 'source-directory' directives to do
# so.
# PVE will preserve these directives, but will NOT read its network
# configuration from sourced files, so do not attempt to move any of
# the PVE managed interfaces into external files!
auto lo
iface lo inet loopback
iface wlp2s0 inet manual
iface enp1s0 inet manual
#vms bridge interface (LAN on OpenWRT)
auto vmbr0
iface vmbr0 inet manual
bridge-ports none
bridge-stp off
bridge-fd 0
#wan interface for OpenWRT or DMZ
auto vmnatbr0
iface vmnatbr0 inet static
address 10.10.30.1/24
bridge-ports none
bridge-stp off
bridge-fd 0
post-up echo 1 > /proc/sys/net/ipv4/ip_forward
post-up iptables -t nat -A POSTROUTING -s '10.10.30.0/24' -o wlp2s0 -j MASQUERADE
post-down iptables -t nat -D POSTROUTING -s '10.10.30.0/24' -o wlp2s0 -j MASQUERADE
post-up iptables -t raw -I PREROUTING -i fwbr+ -j CT --zone 1
post-down iptables -t raw -D PREROUTING -i fwbr+ -j CT --zone 1
So, to break it down, what's happening here is:
iface wlp2s0 inet manual
This wireless interface is being managed by Network Manager. I don't want PVE to do anything with it, so I've set it to manual.
#wan interface for OpenWRT or DMZ
auto vmnatbr0
iface vmnatbr0 inet static
address 10.10.30.1/24
bridge-ports none
bridge-stp off
bridge-fd 0
post-up echo 1 > /proc/sys/net/ipv4/ip_forward
post-up iptables -t nat -A POSTROUTING -s '10.10.30.0/24' -o wlp2s0 -j MASQUERADE
post-down iptables -t nat -D POSTROUTING -s '10.10.30.0/24' -o wlp2s0 -j MASQUERADE
post-up iptables -t raw -I PREROUTING -i fwbr+ -j CT --zone 1
post-down iptables -t raw -D PREROUTING -i fwbr+ -j CT --zone 1
This is the WAN interface for the VMs. I've stood up a virtual router, OpenWRT, that all VM traffic routes through. Unlike a typical PVE configuration, I'm using IP tables to enable masquerade (NAT) for the bridge through the wlp2s0 wireless interface. I also had to install conntrack and configure it for the NAT to the VMs to work correctly. You can read more about that here: https://pve.proxmox.com/pve-docs/pve-admin-guide.html#sysadmin_network_configuration
#vms bridge interface (LAN on OpenWRT)
auto vmbr0
iface vmbr0 inet manual
bridge-ports none
bridge-stp off
bridge-fd 0
Finally, this is the bridge that the VMs actually connect to. So, the traffic flow is WLAN->Proxmox Host->VM WAN Bridge->OpenWRT->VM LAN bridge->VMs
This configuration works great for me. Unlike at home I'm not doing much with firewall configuration in OpenWRT but rather relying mostly on VM-level PVE firewalls. The purpose of OpenWRT in this setup is to built the VPN tunnel that all of the VMs can use to talk to my LAN network without having to connect each of them individually. I'm not going to get in too deep with the configuration of my VPN setup to connect back into my LAN but it's relatively straightforward. Build the tunnel, install the routes, and move on.
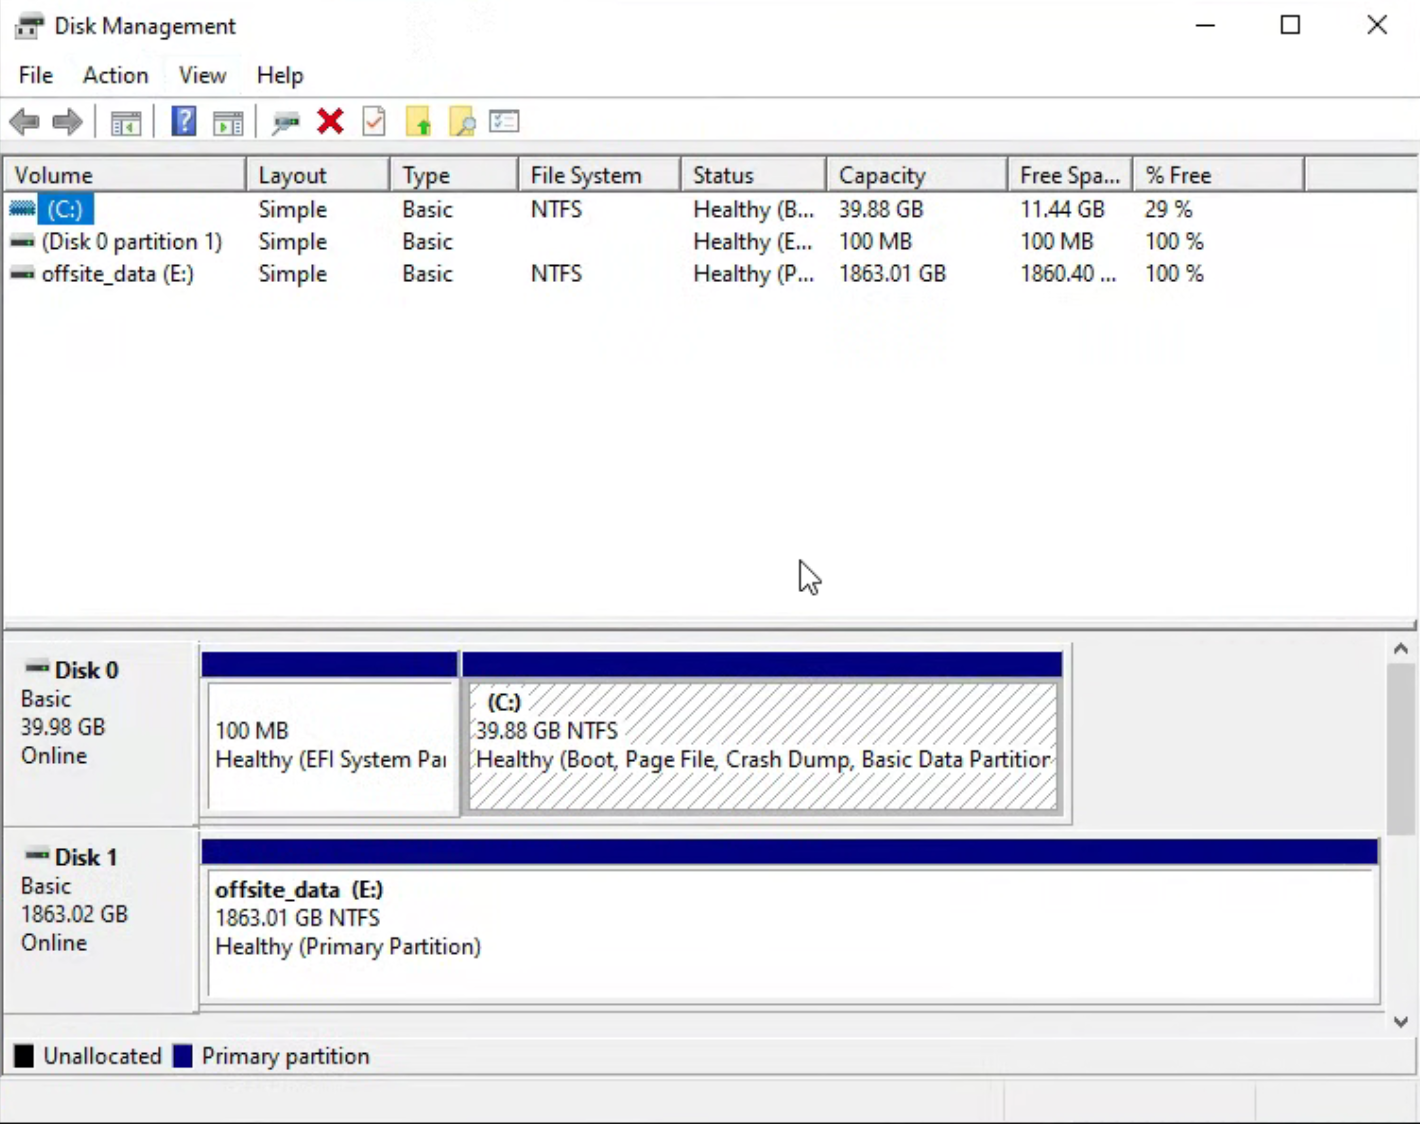
Passing through storage to the file server
The primary purpose of this build is to colocate data. At home I'm using a Windows file server with Stablebit Drivepool (JBOD) and SnapRAID. I wanted to do the same thing in this setup so I that meant that the file server VM needs to be running Windows. I also wanted to make sure that in the event I need to move that storage to another Windows device I don't have to deal with a hypervisor layer like ext4 to get to the Windows data. To accomplish this I'm passing the storage through from the hypervisor directly to the VM. When I first set up the IO CREST storage and attached it via USB 3.2 using the included USB C cable I was having strange IO errors. It turns out the cable they shipped it with wasn't actually rated for USB C 3.2. When I looked at it with lsusb I could see that it was negotiating for 480 Mbps (USB 2.0) even though the bus was USB 3.2. I bought a $30 Anker replacement cable and everything works great now.
To actually pass through the storage is pretty straightforward. Identify the target VM ID (for me it's 100), identify the by-id path to the disk, and run the following command to attach the disk directly to the VM.
sudo qm set 100 -scsi1 /dev/disk/by-id/{usb-disk-serial-path}
If you attach additional disks, increment the -scsin flag as needed.
Once the disk is passed through to the VM it is literally as though it is plugged directly in.
I am configuring Bitlocker encryption on all of them and should I need to move them to another (physical for example) Windows device I won't have to do anything other than use the recovery process to recover and unlock them. No dealing with messy abstraction layers, extracting from a qcow/vmdk, etc.
Final Thoughts
Working through this process for me was fun and quite rewarding but it was fairly time consuming. I'd estimate I spent probably 25-30 hours getting it configured the way that I want it. A lot of that was troubleshooting, some of it was research, and the least of it was just doing the expected configuration. I benefited from the fact that I already have a Rustdesk Relay and Signal server deployment so getting Rustdesk installed and configured on the Proxmox host was pretty trivial. This means that any time I need to be able to get into the host as long as it has wifi connectivity I can reach it. I'm also using the PVE environment to host several VMs: OpenWRT, Pi-hole, VPN Server, Fileserver, and Password Manager. The Trycoo WI-6 has proven to be excellent for this because I'm maintaining a fairly light load overall, but it's important to remember the limitations of this small form-factor device. As far as security, if you decide to do anything similar for yourself, remember that this is essentially a device in the wild and so at-rest encryption as well as robust network security are critical. For network security I'm using NAT, a host firewall, a virtual router, PVE VM firewalls, and operating system firewalls. The networking in this configuration is fairly complex. Traffic back to my home network over the VPN tunnel is actually triple-NAT'd. For data-at-rest encryption I'm using BitLocker, but that only protects the colocated data. You can read about how I encrypt the Proxmox setup itself here: https://forum.proxmox.com/threads/adding-full-disk-encryption-to-proxmox.137051/
Leave me your thoughts below. I'd love to hear from you.
- Andrew
topics proxmox ve, storage